First important thing at this stage, you have to identifying the type of plastic you are working on, especially if you are plastic welding. Just as it is impossible to weld steel with an aluminum rod, it is also impossible to weld ABS with a nylon rod.
It is essential that you select the proper welding rod to match the plastic you are working on.
The repair method you choose depends on two things:
1 The material of the plastic itself.
2 The tools and materials you have available to make the repair.
The information on the next topics will give you some guidance about how to identify the plastic you want to
repair.
Below is a brief discussion of the various repair tools and materials.
The Most Popular Plastic Repair Processes are:
- Thermoplastic Nitrogen / Hot Air Welding
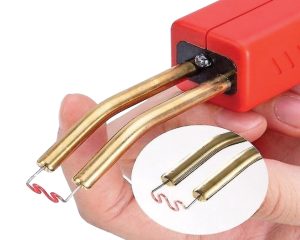
- Thermoplastic Airless Fusion Welding
- FiberFlex Universal Rod
- Thermoset Urethane Repair
- Two-Part Adhesives and PlastiFix
 Thermoplastic Nitrogen/Hot Air Welding
- Fastest, strongest fusion repair method
- Can use ribbon rods for greatest strength
- Consumable cost is low
- Equipment cost is relatively high
- Can’t be used on thermoset plastics
- The choice for professionals and frequent users
- Versatile, use on thermoplastics and on thermoset PUR
- Equipment is inexpensive
- Welding process is slower and weld strength is not as great as nitrogen/hot air welding
- The choice for professionals and frequent users
Thermoplastic FiberFlex Universal Rod
Intended mainly for bumper cover repair. Not a fusion welding process. Don’t use on fuel or radiator tanks.
Thermoset Urethane Repair
PUR (plastic type) is mainly found on older bumper covers, often (but not always) yellow in color.
Thermoset Two-Part Adhesives and PlastiFix
PlastiFix is a great choice for acrylic (Plexiglas) and ABS. Two-part adhesives on virtually all other plastics.
- No equipment cost.
- Versatile, can be used on virtually any type of plastic (except polyethylene).
- Essential for repair of thermoset plastics.
- Often not as strong as welding
- Consumable cost is higher than welding
These are the most popular and famous methods for plastic repairs, and in order to know the right process to use, you have to know the plastic family, which is divided for 2 main branches:
- The thermoplastic family
- The thermoset family
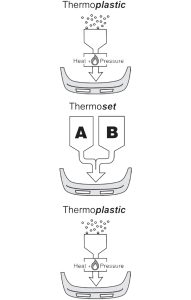
Thermoplastics CAN be fusion welded.
Thermoplastics can be melted and resolidified. The carbon molecule chains that make up the plastic do not have crosslinks, so the molecule chains can slip by one another when the material is heated.
Most car bumper covers today are made of PP blends (PP+EPM, TPO, TEO).
To make a PP bumper, pellets of plastic are melted and injected into the mold. The melted plastic then resolidifies as it cools.
The preferred method of repair is by Nitrogen/ Hot Air welding or airless fusion welding.
Most materials that you would identify as “plastic” are thermoplastic, port-a-potties, garbage cans, playground slides, milk jugs, etc.
There are many different types of thermoplastics, so if you are going to do a weld repair, you need to identify the type of plastic using the ID chart on the next pages.
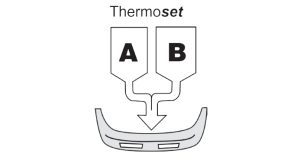
Thermosets CANNOT be melted or fusion welded, they are formed via a chemical reaction between two components.
This forms crosslinks between the molecules of the plastics which keeps it from melting.
If you try to melt a thermoset material, you will destroy the material. Polyurethane (PUR) is a common type of thermoset plastic used for car bumper covers and some truck bedsides.
Most of the time it is yellow in color (but not always).
Polyurethane can be repaired, but not with the nitrogen/ hot air welding process. Since the plastic does not melt, an adhesive repair must be done using either R01 urethane welding rod or two-part adhesives.
Thermoset materials are common on large parts like heavy truck hoods.
Examples of thermosets commonly used on automobiles are fiberglass, and carbon fiber reinforced plastic.
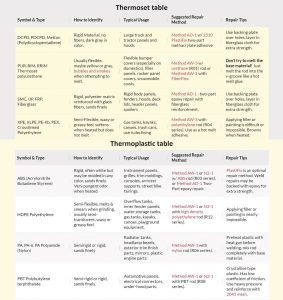
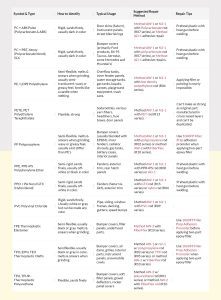
These table shows the plastic most often used in automotive applications:
 Preparing Plastic for Repair
- Clean surface
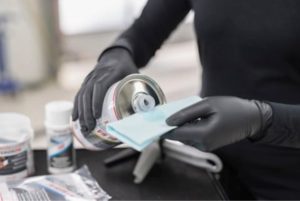
In order to maximize strength any repair, thoroughly clean contaminants from the surface in the damaged area.
Step 1
Clean both sides with soap and water. Dry with a clean cloth or compressed air.
Step 2
Spray Plastic Cleaner onto the surface and wipe off while wet with a clean, lint-free cloth.
Wipe in one direction to avoid spreading contaminants back over the clean area.
Do not use cleaner after sanding or grinding the plastic.
Use compressed air or cloth to remove dust.
Align Damage, Remove Dents and Deformation
If the plastic is distorted, heat with a heat gun and reshape the distorted area.
When heating plastic, it is important that the plastic be heated all the way through.
Hold the heat gun on the area until the opposite side of the plastic is uncomfortable to the touch.
Once heated, force the plastic back into position with Bumper Rollers or other appropriate tool, then cool the area with a damp cloth.
Stretched areas can be shrunk with the bumper cover cold. Keep working until smooth, then sand overall with 80 grit to help identify remaining low spots.
Push out remaining low spots and repeat the process.
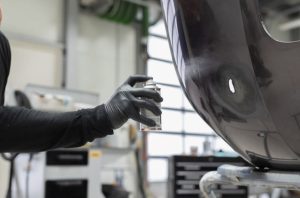 Thermoset polyurethanes (PUR, RIM) have a “memory” that will often cause them to go back to their original position if held under a heat lamp or in a heated spray booth.
If the part is cut or torn to the edge, align the cosmetic surface with Aluminum Body Tape and begin the repair process on the back.
By aligning the outer surface, you minimise the amount of filler required to restore the proper profile to the part.
Method A, Thermoplastic Nitrogen / Hot Air Welding
Welding with nitrogen or hot air involves the coordination of both hands, one controlling the torch and the other feeding the rod.
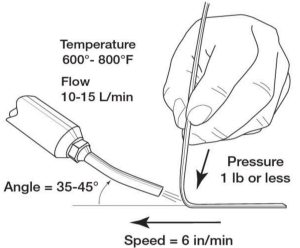
When you weld, you just want to melt the bottom surface of the rod and the top of the substrate.
You don’t “puddle” the rod like you do in metal welding. This makes for a stronger repair because it leaves the basic structure of the rod intact.
When you’re making your weld, make sure you melt both the base material and the rod at the same time and fuse them together with slight downward pressure on the rod as you make your pass.
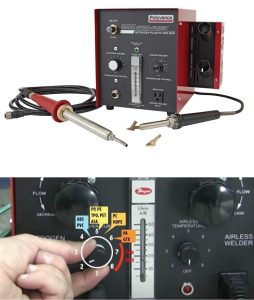 For temperature, set the temperature on the nitrogen welder’s dial to the proper setting, as manufacturer recommendations.
For example, the PP/TPO setting will generate an air flow of about 700°-800°F (371 to 427 Co).
- The flow should be set between 10 to 15 liters per minute depending on the plastic’s thickness; less for thinner plastics, more for thicker.
- An angle of 35-45° between the welder tip and the substrate is optimum. Aim the stream of hot air a little in front of the rod; for thick rod like the 06 profile, focus a little more heat on the rod. The rod should be about a 90° angle to the base material.
- The orientation of the welder tip can play a role in where the heat is concentrated. With the tip oriented “down”, more heat will be focused on the substrate. With the tip oriented “up”, more heat will be focused on the rod.
- The distance of the tip to the work is important because the temperature of the gas stream drops quickly the farther away the tip is. Keep the tip close to the work to ensure that the proper temperature is being used.
- Put a light downward pressure on the rod to fuse the rod and base material. Keep a steady downward pressure on the rod and keep the rod moving slowly. Don’t overheat the rod and let it fold over backwards.
- The speed of your weld should be about 4 to 6 inches per minute (10 to 15 cm/min). With thin rod like the 03 profile, it’s difficult to go this slow. With thick rod like the 06 profile, it may go even slower.
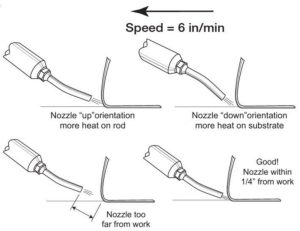
The important thing is to move steadily while making sure the base material and the bottom surface of the rod are both melted before they come together.
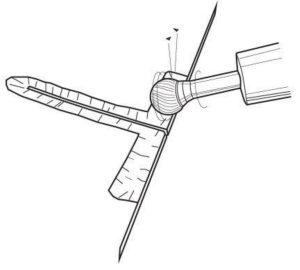
Prep Backside for Weld
Tape the crack on the frontside with aluminum tape to align cosmetic surface.
Hot staples may also be used if needed to stabilize the crack.
- Grind V-groove along the crack at least as wide as the welding rod you plan to use to expose raw plastic. If the crack extends to the edge of the plastic, grind along the edge to prepare for a “cross stitch” weld to strengthen the repair.
- Grind no more than halfway from thickness through the plastic on the backside. This is because the frontside weld must go halfway through for adequate strength.
Weld Backside
In most situations, use the medium width (-04 profile) or narrow width (-07 profile) welding rod on the backside.
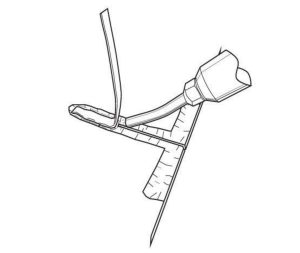 Using the Basic Nitrogen Welding Process, pre-melt the end of the welding rod and the substrate, touch the welding rod down, apply a slight downward pressure on the welding rod to start rolling it toward the welder tip, then keep the heat focused closely to melt both the rod and substrate at the same time.
- Allow the welding rod to cool completely to room temperature before continuing the process on the frontside. Cooling may be accelerated blowing compressed air onto the weld or applying water.
Prep Frontside for Weld
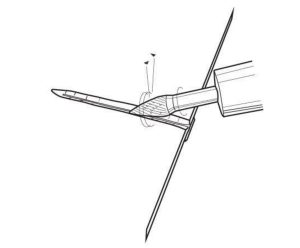 Remove aluminum tape (and staples, if used) from the frontside. Apply aluminum tape to the backside over the weld to support the area and prevent the welding rod from pushing through.
- For welds on the frontside of the bumper cover, it is preferable to use the one-eighth inch round rod (-01 profile) or the narrow ribbon (-07 profile) to keep the weld area as narrow as possible.
- Use a tapered or small round cutter bit to make a deep, narrow v-groove as wide as the welding rod you plan to use. Grind about halfway through the plastic to ensure there is enough welding rod fused with the base material to provide adequate strength once the weld is sanded smooth. Make sure the v-groove tracks precisely down the middle of the crack. Grind about 1/4” (0.6 mm) beyond the crack on both ends.
Weld Frontside
Start the weld by heating the end of the welding rod and the substrate for about ten seconds until both plastics appear to be melted on the surface.
- Touch the welding rod down onto the surface and apply a light downward pressure. Maintain a steady, light pressure on the welding rod and let the rod collapse down onto the substrate as it melts.
To get a good fusion weld, it is essential that you melt both plastics at the same time before they come together. Continue the process until you reach the end of the V-groove, focus the heat on the rod until it is completely melted, and gently separate it from the welding rod you have applied to the base material.
- Depending on the thickness of the plastic, you will probably find it necessary to apply another pass of welding rod to completely fill the V-groove.
- Once the weld is completed and the welding rod is still hot, use the flat tip of the airless plastic welder to smooth the weld down. Make one slow, even pass to smooth the rod and eliminate porosity and imperfections.
- Once weld cools completely to room temperature, sand smooth and prepare for application of filler or primer.
Nitrogen Welding – Slot Tab Repair (Sop):
Most automotive bumpers, side panels, and fuel tanks are made of polypropylene (PP) blends and are best repaired using the nitrogen welding process.
A common point of damage on these parts is torn slot tabs.
This SOP will guide you through the repair process using Polyvance’s Nitro Fuzer plastic welder, 6146 Bumper Pliers, and polypropylene welding rod.
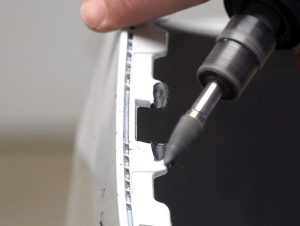
Step 1: Bevel the Edges of the Tab
Using a drum sander or die grinder with a tapered bit, bevel the edges of the broken slot tab.
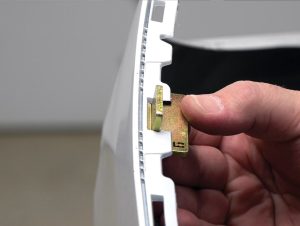
Step 2: Select the Proper Pliers Die
From the pliers kit, select the numbered die that best fits the desired slot size. Die should be snug, but not tight.
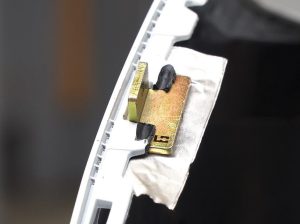
Step 3: Secure Die in Slot
Secure the die in the slot with aluminum tape.
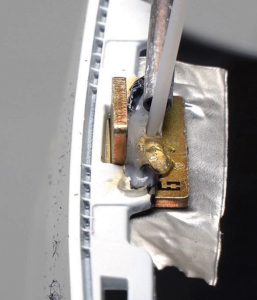
Step 4: Weld Around the Die
Using Polyvance’s nitrogen plastic welder and R02 series plastic welding rod, weld around the die. You will most likely need to make two passes with the welding rod to match the original thickness. You may also have to weld a pass of rod beside your new welds in order to get the width to match that of the original tab.

Step 5: Remelt the Filler Rod
Using the nitrogen welder, remelt the filler rod until it turns transparent.
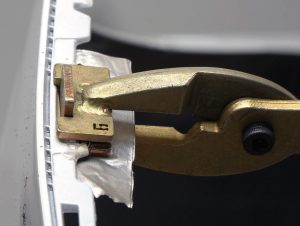
Step 6: Flatten the Weld
Flatten the melted weld material using the numbered matching pliers until the plastic matches the original flange thickness.
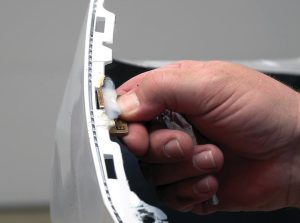
Step 7: Remove Tape and Die
Once cool, remove the aluminum tape and the slot tab die.
More rapid cooling can be accomplished by blowing the plastic with compressed air or by wetting the area with water.
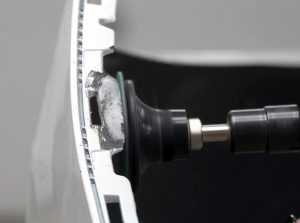
Step 8: Shape the Tab
Now you can shape the tab with a variety of tools, such as the airless plastic welder, a drum sander, or a Roloc disc.
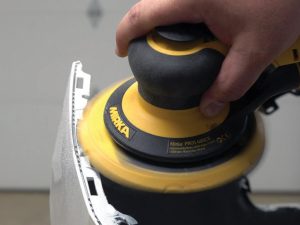
Step 9: Sand Smooth
Once cool, use a DA sander or sand by hand to remove any extra material and refine the overall shape of the tab.
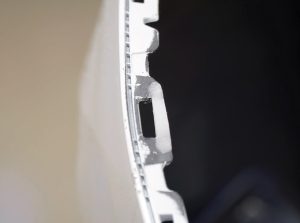
Step 10: Finish Out the Tab
Once you are satisfied with the tab’s shape, finish sand, fill and prime , and prepare the tab for paint.
AUTHOR

BASHEER ALATAWNEH
Business Development Manager
JoClaims
Amman – Jordan


