Colour results from how objects reflect the light at different frequencies, or wavelengths, into our eyes, the colour is seen depending on light waves reflecting off the surface, when these light waves bounce off a surface and strike the retina, then our brains process the different frequencies into colour.

Figure: 1
Visible light is a form of electromagnetic (EM) radiation, as are radio waves, infrared radiation, ultraviolet radiation, X-rays, and microwaves.
Generally, visible light is defined as the wavelengths that are visible to most human eyes.
EM radiation is transmitted in waves or particles at different wavelengths and frequencies.
This broad range of wavelengths is known as the electromagnetic spectrum.
That spectrum is typically divided into seven regions to decrease wavelength and increase energy and frequency.

- Violet : 400 – 420 nm
- Indigo : 420 – 440 nm
- Blue : 440 – 490 nm
- Green : 490 – 570 nm
- Yellow : 570 – 585 nm
- Orange : 585 – 620 nm
- Red : 620 – 780 nm
Figure: 2
The common designations are radio waves, microwaves, infrared (IR), visible light, ultraviolet (UV), X-rays, and gamma-rays.
Visible light falls in the range of the EM spectrum between infrared (IR) and ultraviolet (UV).

Figure: 3
What the eye sees as colour is absorbing all of the light except the colour that it appears to be.
Red has the lowest frequency, or wavelength, of light. A Red object only reflects the lowest frequency waves in the light.

Figure: 4
A Red ball appears Red because the ball absorbs all of the colours in the light shining on it except for the Reds. On the other hand, a Black object absorbs almost all light, while a white object absorbs none of the light wavelengths.

Figure: 5

Figure: 6
White light is a mixture of various colours of light. By passing light through a prism (a piece of glass with a pyramid-like shape), light can be broken down into its separate colours, called the colour spectrum.
 Figure: 7
This is the same principle by which raindrops sometimes break up sunlight to form a colourful rainbow arc in the sky.

Figure: 8
The colours in the spectrum are easily remembered with the phrase “Roy G Biv,” which stands for the colours:
Red
Orange
Yellow
Green
Blue
Indigo
Violet
Sunlight is the best lighting to use when evaluating colour.

Figure: 9
Automotive Paint Colour
The automotive paint on sheet metal consists of many layers, with a thickness of paper thick, and generally its two types, thinner base, and water base.
Solid colour, colour is seen as light reflecting off the basecoat only. The basecoat colour shows through the transparent clear coat.

Figure: 10
Metallic colour paints, colour is seen as light reflecting off the basecoat and also off metal flakes.
The base colour and metal flakes both reflect light to produce the paint colour.
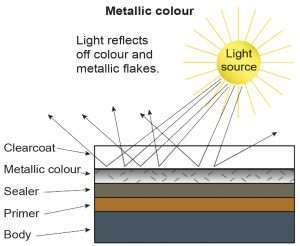
Figure: 11
Pearl Colour
The mica particles in a mid-coat act like tiny diamonds that reflect, and pass light. Base coat colour and mica particles in the middle layer of a clear coat produce a pearl effect.
 Figure: 12
Colour Code
Automotive colour on the vehicle consists of many colours mixing, and all that depends on standard amounts of every single paint, and all the amounts are coded in colour code which you can find on a standard label pasted on the vehicle with a known location.
The next chart can be used to locate the service label that provides paint codes for most makes of vehicles.
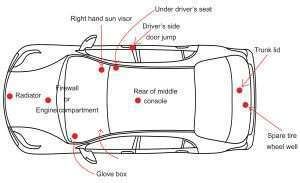
Figure: 13
Adjusting Spray Gun
Spray gun distance is measured from the spray gun nozzle to the surface being painted. Most spray gun manufacturers recommend that you keep the spray gun about 6 to 10 inches (200 to 255 mm) approximately from the surface being sprayed.
HVLP guns should be kept 6 to 8 inches
(from 15 to 20 cm) from the body surface.
Older higher pressure spray guns should be kept a little farther from the body surface, 8 to 10 inches (from 20 to 25 cm) approximately.
This is true when doing test spray patterns and when painting a vehicle.
If you hold the spray gun too close to the surface, the paint will pile up unevenly on the surface and the paint film can run or sag. If you hold the spray gun too far away, the material will partially dry before it hits the surface.
The paint will look dull (a light colour) and will not flow down smoothly.
Difficult areas such as corners and edges should be sprayed first.

Figure: 14
A Older low-efficiency guns caused much more overspray waste. More paint was blown off the body surface by high pressure.

Figure: 15
B Modern high-volume, low-pressure, or HVLP, spray guns use less material to cover the same area. They waste less paint material due to reduced overspray.
The correct gun-to-work distance is important to prevent runs or dry spray problems. If the gun is too close, the finish material piles up and causes runs and sags.

Figure: 16
When the gun is too far away, the material tends to dry into dust before reaching the surface.

Figure: 17
Note what happens by turning the fluid control knob.
Professional technicians open the fluid valve almost all of the way counterclockwise so they can paint more quickly.
However, the gun must be moved over the body surface more quickly to prevent paint runs or sags with maximum paint flow out of the gun.

Figure: 18
Adjusting the lower fluid flow control knob, which controls how fast liquid is sprayed out of the gun

Figure: 19
Pattern width adjustment is done by turning the adjustment knob as shown. Note how screwing the air knob out, or counterclockwise, makes a round pattern form into the desired fan shape.

Figure: 20

Figure: 21
Spray Gun Stroke
Spray gun stroke refers to the hand motion used to move the gun while spraying. The proper stroke is important in obtaining a good paint job.
To obtain a good stroke technique, hold the spray gun at the proper distance from the surface—8 to 10 inches (200 to 255 mm).
If the humidity or temperature is high, a slightly shorter distance may be necessary.
If the spray gun distance is too close, the high velocity of the spraying air tends to ripple the wet paint film.
If the spray gun distance is too great, a poor colour match will result.
Generally, you should hold the gun perpendicular to the surface being sprayed.

Figure: 22
Handling a spray gun takes concentration.
You must constantly watch the body and keep aiming the gun straight at the surface contour.
Try to hold the gun parallel to the surface.
When applying a full wet coat to a flat surface, keep the gun nozzle aimed straight at the surface.
Do not fan or swing the gun sideways.

Figure: 23
The right way (perpendicular)

Figure: 24
Wrong way
If you arc or fan the gun on a flat surface, the paint film will be thicker in the middle and thinned out to the sides.

Figure: 25
If you arc or fan the gun to match the shape of a body contour, you can maintain equal paint film thickness.

Figure: 26
The first pass should be centred at the top of a panel, half on the masking paper and
half on the body surface. The next paint pass or stroke should overlap and cover half of the previous pass. The pass should extend a bit off the sides of the panel and onto the masking
paper a little. Trigger the paint off but leave the air on at the end of each pass.

Figure: 27
Spray Gun Cleaning Tank
A spray gun cleaning tank also called a gun washer/recycler, is a pressurised container
for flushing the gun and other tools with a cleaning solution. It is used by most modern
body shops because it saves time and keeps spray guns in good, clean condition. Or it can
be cleaned manually by thinner after being used directly.

Figure: 28
Painting Steps
We will be talking about the process step by step. You cannot skip any step to execute the task faster. Skipping anyone, the step may lead to failure and undesired results. You strictly need to follow every step in the same order.
Painting a car requires a suitable environment with zero dust around and no excessive moisture which means that you cannot paint your car in the open air.
You need to have a closed room for this purpose; a room with no dust and no extra moisture required. (paint booth)
In a suitable environment, suitable tools are also required. Several tools are necessary to paint a car; a tool to sand the vehicle, a tool to paint it, and a tool to protect unwanted areas from being painted. All these tools help to entirely paint a vehicle and complete the process successfully with desired results.
Additionally, we are going to be talking about the rust spots and the right way to deal with those rust spots. You cannot directly paint on those rust spots if you want your paint to stay there for a long time. Treatment of those rust spots is very important, and there is a proper way to treat them.
It will be followed by discussing the way to get rid of dust particles if any because paining a car is a very detail-based work and a minor dust particle might lead to an undesired result or not a preferable work.
We will be looking for a smooth and dust-free body of the vehicle before we start painting
the car.
Once satisfied with the dust-free body of the car, the use of sprayers will be discussed to paint the car. This is the actual step that would leave the most visible impression on the viewer. But you will still have to execute one more step to complete the procedure of painting the car.
The final step would be priming the vehicle.
We will be talking about it in the detailed section of this chapter given below.
All the steps are going to be mentioned in detail with the best recommendation for each task.
This section will help you learn the skill of painting a car in standard time.
Step 1: Repair Damaged Parts.
- Repair dents.
Using a dent repair kit. The first thing you need to do is clear those dents because it requires a smooth surface for successful painting.

Figure: 29
- Fill out gouges (holes), dings, and depressions using a body filler putty.
Body filler is the finishing touch for most sheet metal repairs. Restoring bent and stretched HSS to its exact original shape.
Minor surface irregularities that remain after metalworking can be quickly filled and smoothed with a thin coat of body filler.
It is critical that you properly prepare the surface and apply the correct type of fillers. If not, the filler can crack or pop off, or the top coat of paint may be adversely affected.

Figure: 30
Now, this is another task; you will find many body filler putties from the supply store. It is a filler material that needs to be mixed before applying. You have to mix it for a while to make it a creamy mixture. Each type of paint has its recommended body filler. And has a specific amount for mixing it with its partner material (dryer).

Figure: 31
Body filler & Hardener
Then apply it over the uneven area with the help of a clean spreader or buffing pad.
Those areas will become smooth and uniform, ideal for the perfect painting.
Now there are times when your area is not filling with these body fillers because the holes are very small for this material. To deal with smaller imperfections, there is a filler material called glazing material.
This glazing putty is much thinner than ordinary fillers and perfect for filling the places which are not done by thicker fillers.
- Sand the edges.
Sand around the hardened filler to smooth it out. Body filler doesn’t dry it cures via a chemical reaction. To speed up this process, you can use a hand dryer or a heat lamp. After the putty has cured completely, you might notice a few bumps on the edges. For this purpose, sandpaper is used to balance all areas.

Figure: 32
Make sure to sand the desired area in all directions, with circular and straight strokes for a good finishing.
Step 2: Strip the Existing Finish.
- Use an electric orbital sander.
To remove the paint from large areas. Before you paint, you have to remove the previous paint with the help of sanding.
A hand sander is not recommended for this step as it will be almost impossible to remove all the paint with it.
Even the electric orbital sander takes a lot of time to remove all the paint and make the vehicle ready for the new paint, so you have to be very patient in this step.
A high-speed sander is good for this step as it will allow you to work quickly; having an electric sander is a must.

Figure: 33
- Always run your sander over the desired area in circles before painting.
While sanding the vehicle, you have to keep in mind to apply the same pressure to all the areas, so that the same amount of paint is removed from each part.
Always use the sander in a circular motion for better results and a smooth area.
- Wipe the painting area with a clean, wet towel to wipe off any debris.
After completing the sanding process, you have to move to the next step which is cleaning.
Cleaning is important to avoid any dust particles to become a hurdle in your way. The dust particles from sanding will be stuck to your fresh paint, making it look awful.
So a wet cloth is used to clean the exterior of the vehicle. Make sure the area is wiped properly.
Step 3: Prim the Body for New Paint.
- Mark the part of the vehicle you don’t want to get a primer on.
After you are done with the entire previous steps, you now put primer on your vehicle.
But before that, mark all the areas where you don’t want to put primer. You can cover those areas with a masking paper and put tape on the edges to secure them.
It will protect that area; especially the tires need to be sealed properly before painting, so no primer gets on it.
The best way is to do it outside the spray booth to avoid a mess in a small room. And make sure to cover the lights, windows, and trunk carefully.

Figure: 34
- Apply a base coat of automotive primer using a paint sprayer, (the spray gun).
The primer needs to be properly mixed for a perfectly thin coat.
- Wait for an initial coat of primer to dry.
For touch-ups, a thin base coat is more than enough, but if you want proper paint on the car, then you have to apply a few layers of primer.
But first, you need to wait sometime for the first coat to dry completely. After it has dried, sanding is done for a smooth area for the next coat then the coat is applied.
If you start sanding on the wet surface, then your primer will rub off, so it’s better to wait for an hour so that you don’t have to redo all the hard work.
- Block sand the base coat to smooth out.
Sometimes you see visible uneven spots after the first coat. A block sander is perfect for this task, a 1200 grit sanding block is recommended.
Use it in curves and circular motion but don’t put too much pressure, making it even so that it matches the surroundings.
- Prime and sand two more times to ensure a quality finish.
Repeat the above procedure 2 to 3 times for great finishing. But don’t sand until the primer has completely dried off. Wait for an hour after every coat and then do the sanding for the next coat. Two to three coats are enough for the car. Finally, the car is ready for paint.
Step 4: Painting the Vehicle.
Painting is very much similar to priming. Mix the paint according to the car colour code, with the exact quantity using the paint balance.
Final Words
If you miss steps just for completing the task quickly, you might experience bad results and do all the hard work again, sometimes double hard work.
After following all the steps carefully, you
can achieve the professional level painting of
your object.
Hint
Normally we have 2 major types of paint:
- Solid colour
- Metallic colour
First
Solid colour
- Start for painting with first coat.
- Wait 10 min to let this face dry.
- Apply the second coat
- Paint is finished.
Second
Metallic colour
- Start for painting with first coat.
- Wait 10 min to let this face dry.
- Apply the second coat.
- Wait 10 min to let this face dry.
- Apply 3rd round but in half quantity to let the metallic pieces clearly shown on the paint.
- Wait for 10 min until this face dry.
- Apply the first clear coat.
- Wait 10 min until this face dry.
- Apply the second coat.
- Paint is finished.
Note 1:
Primer usually named as “2k” And its mixing ratio is 4:1, 1kg from primer to 250g from hardener.
Note 2:
Colour coat mixing ratio is 2:1, 1kg from paint to 1/2kg from thinner.
Note 3:
Clear coat mixing ratio is 2:1, 1kg from
clear coat to 1/2kg from hardener.
Business Development Manager
JoClaims, Amman – Jordan


